Product-Project Framework
An overview of my approach to managing products and projects
Here, I showcase my approach to driving product development and managing projects efficiently
Contents Overview
- Product Development Cycle
- Software Development Best Practices
- Feature Discovery
- Project Execution and Control
🔄 Product Development Cycle

This Agile Sprint-based SDLC is designed to fit my team’s workflow, focusing on task management, feedback loops, and continuous improvement. The cycle consists of the following phases:
- Sprint Planning (1-2 days): We review priorities, break down Epics, and assign tasks for the sprint.
- Sprint Progress (1-2 weeks): Tasks are worked on and tracked in JIRA, ensuring ownership and progress.
- Sprint Review: Task owners present completed work, SME/QA validate, and meeting minutes are captured.
- Sprint Retrospective: The team discusses blockers and opportunities for improvement in the next sprint.
- Sprint Validation (1-2 days): The sprint is closed in JIRA, and a final review with SME/QA is conducted.
🛠️ Software Development Best Practices
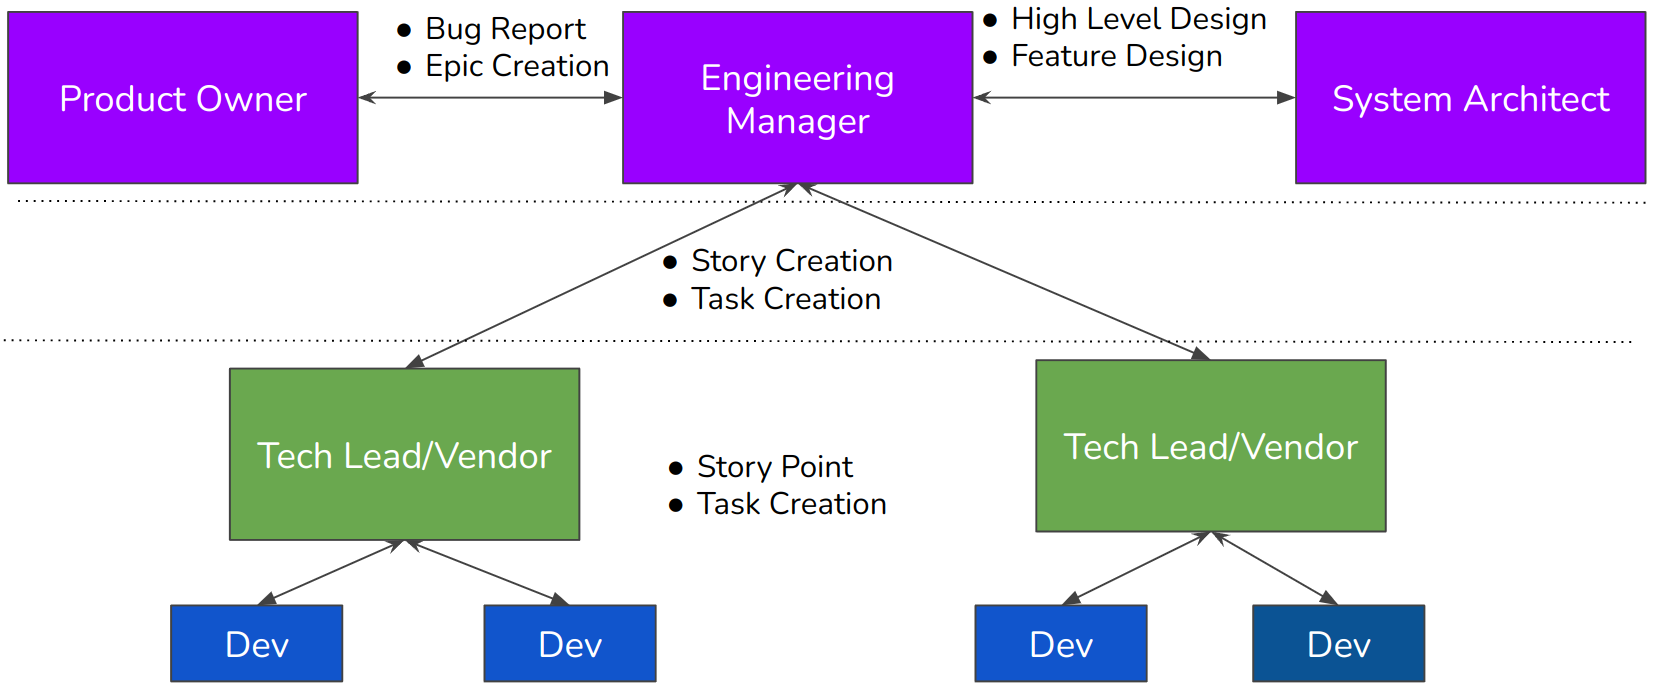
In my role as a Tech Lead, I have consistently prioritized the implementation of best practices to ensure efficient, maintainable, and collaborative development. Here are the core principles I established and enforced during my tenure:
- Code Dev. Notes: Write clear comments to make code easy to read and maintain.
No Rule Explanation 01 Header Description Every new script must have a header with a brief description explaining its purpose and why it is needed. This helps others quickly understand the script's function without digging into the code. 02 Comment on Function Add a comment at the top of every function you work on, especially if it is complicated or unconventional. Simple explanations about what a function or block of code does are highly recommended to improve readability and maintenance. 03 Documentation and Flowchart For every new feature developed, provide proper documentation that explains how to use it and how it works in a nutshell. Preferably include a flowchart. Upload the documentation to the dedicated Confluence page for easy access and future reference. 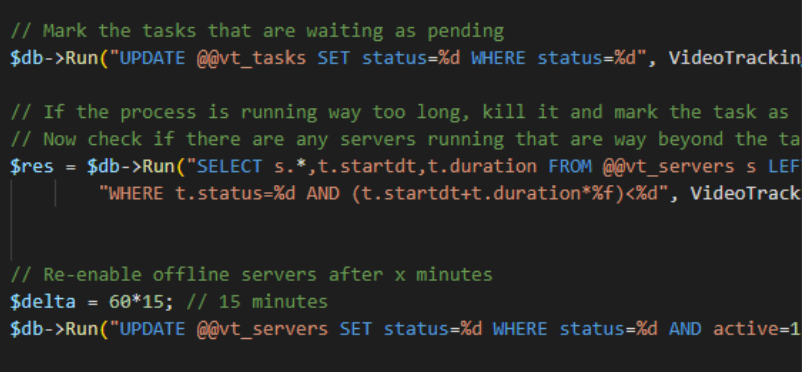 Code Notes Example
 - Git Rules: To have readable and maintainable repository, our team follow this rule while working collaborativly on Git.
Rule Description 01 Only work directly on the main branch if you are absolutely sure of what you are doing — preferably use a separate branch. Production is only pulled from the main branch. The main branch should always be stable and up to date! 02 If you are working on a big feature (determined by the tech lead), implement and work on it on a separate branch. Otherwise, you could work directly on the production branch. Always name your branch clearly with the feature name! 03 DO NOT commit changes to the scene if you have NOT changed anything. If you are unsure about changes, ask the team beforehand. Only commit what you have actually worked on! 04 Avoid commit notes like "many fixes" or "changes to various systems". Be specific and descriptive so it's easier to backtrack. Keep your commit messages clear and readable! 05 Merging is only allowed after passing Sprint Review. Merging to the main branch happens after discussion between the developer and maintainer! - Git Workflow: Implement a structured branching and merging strategy to ensure efficient collaboration. Learn more→
 Brief look at how we implement our Git workflow.
 - Product Versioning: Adopt consistent release versioning to help stakeholders clearly understand the scope of each update. Learn more→
 Snapshot of our release versioning.
 This is how we structure our release notes. For confidentiality reasons, the content has been altered and masked.
🔍 Feature Discovery
Feature discovery can come from various angles, but ultimately, it needs to involve potential users to gather feedback. Here, I will illustrate one approach to validate a feature idea.
- Establish a Customer Outreach Method
Develop a method for approaching potential users, including how we funnel them into our product. Here is how we did:
- First, reach out to interested parties via various channels, followed by sending an official email invitation.
- Then, send a Non-Disclosure Agreement (NDA) to protect intellectual property (IP) depend on the items.
- Next, provide access to the product mockup hosted on Figma, with the note that users will need a Google account to interact with the prototype.
- Afterward, send a survey aimed at gauging user interest and gathering initial feedback.
- In the Call to Action (CTA) section, ask if the recipient is willing to participate as a pilot partner, and inquire if they would recommend the product to a colleague or peer.
- Finally, schedule a follow-up meeting to discuss feedback and potential collaboration.
- Rapid Prototyping (e.g., Figma)
Create interactive mockups to visualize the feature quickly and gather early feedback before development.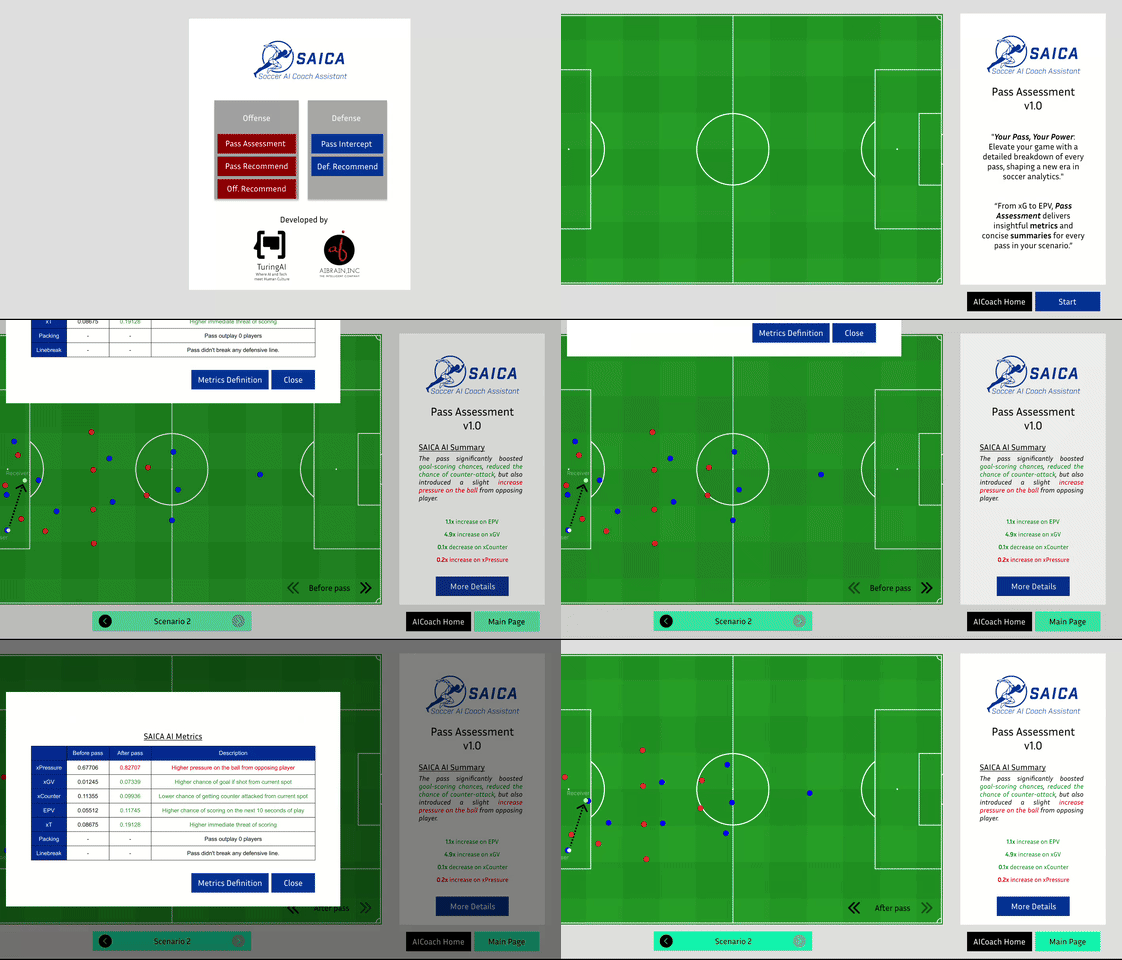 This is example how we do low-fidellity prototype to validate our idea using FIGMA.
 - Distribute User Questionnaires
Design and share focused surveys to validate assumptions, prioritize pain points, and collect insights.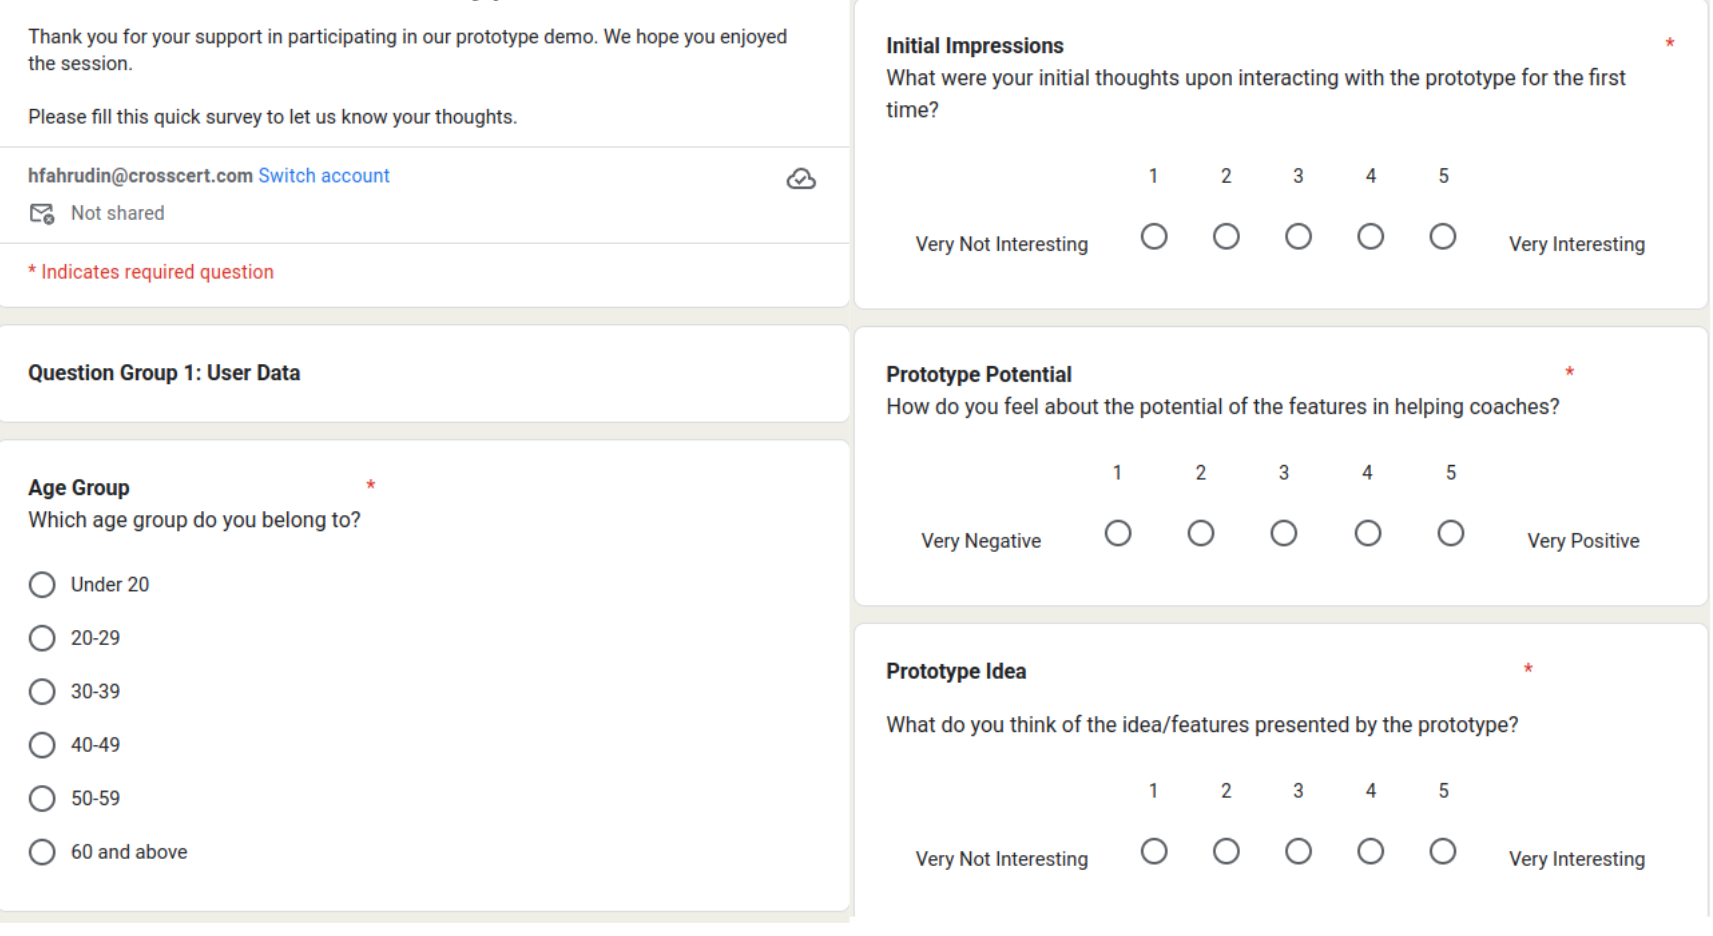 We leverage google form as a medium to collect feedback for our prototype.
🗂️ Project Execution and Control
- Project Phases
Throughout the project, we follow a structured approach with distinct phases to ensure a systematic and efficient process.Phase Description Key Activities Initiation Establish the project foundation, goals, and structure. Define project execution plan, Initial reporting, Set up project environment Analysis Identify, collect, and define detailed requirements from stakeholders. Analyze requirements, Define functional and non-functional requirements Design Translate requirements into system and technical specifications. Create functional specifications, UI design, Database design, Interface design, Define data collection strategy, Mid-project reporting Development Build and integrate components according to specifications. Set up development environment, Define implementation timeline, Develop and integrate components, Conduct unit testing Testing & Training Verify system functionality and prepare users for operation. Conduct integration testing, Perform user training Deployment Transition the system into a live production environment. Deploy in production server, data migration Closing Finalize deliverables and assess project completion. Final reporting, Documentation and knowledge transfer - Work Breakdown Structure (WBS)
We use the WBS to break down tasks and create a schedule aligned with each project phase. I derived a several step on how to do it:- Method to Break Down Tasks: Start by identifying the key deliverables of the project. Break each deliverable down into smaller, manageable tasks, ensuring that each task has a measurable success criterion that aligns with the overall project goals. This helps to keep the progress measurable and on track.
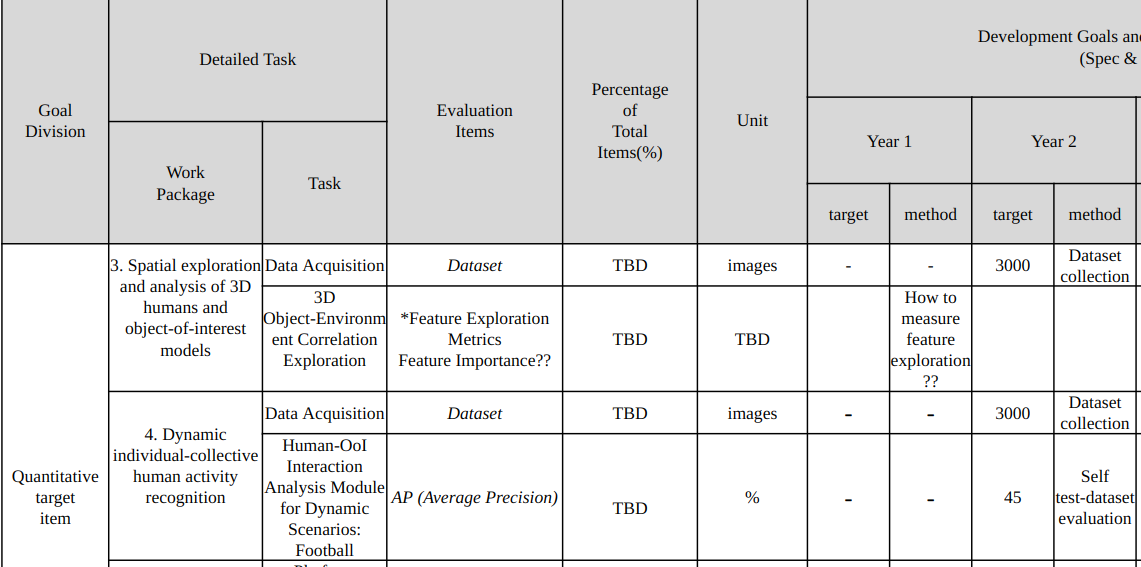 Here’s an example of the table method we use to create the WBS. The columns need to adjusted according to the project.
 - Organizing Tasks: Organize the tasks according to the project phases (e.g., Initiation, Design, Development, Testing). This structure ensures that there is a logical flow and helps maintain a clear understanding of which tasks need to be completed at each phase.
- Creating a Schedule: Once the tasks are organized by phases, create a timeline for each task based on its priority and dependencies. This schedule will help allocate resources efficiently and ensure that tasks are completed in the correct order, leading to smoother execution throughout the project lifecycle.
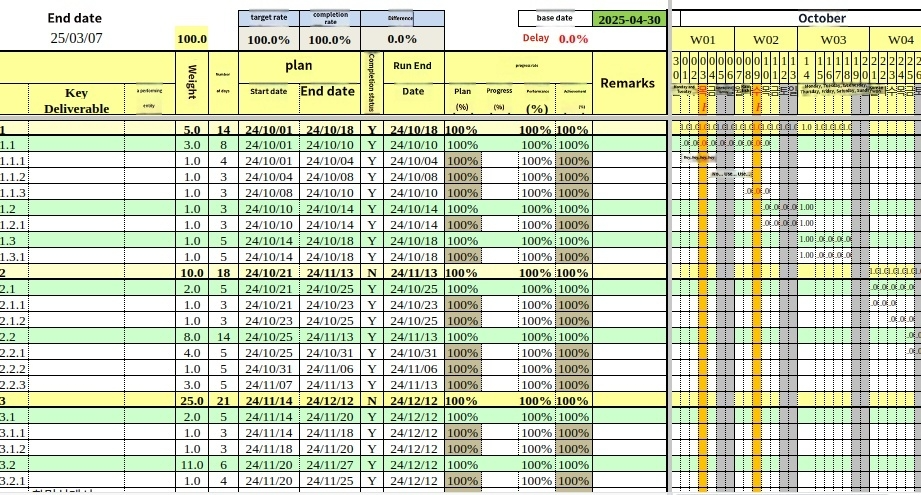 This is an example of the WBS document I use to guide the project. Note: The original figure is in Korean, and I use on-image translation to convert it to English.
 - Method to Break Down Tasks: Start by identifying the key deliverables of the project. Break each deliverable down into smaller, manageable tasks, ensuring that each task has a measurable success criterion that aligns with the overall project goals. This helps to keep the progress measurable and on track.